Topics
- DX Spot Checker Enhanced
- FTP Uploading of Active and Standard Reports Changed
- Introducing AI - Generic
- Introducing AI - DXtreme GPT
To Order
DX Spot Checker Enhanced
1. Call Alerts When a Station You Need is Spotted
You can now be alerted when a station is spotted in the Rich Site Feed or Grid Feed of the DX Spot Checker.
To do so, simply type or paste the desired call sign in the Alert box.
When the alert call sign is spotted, a WAV audio file plays and the call sign, frequency, and time of the latest spot appears in the adjacent text box. The spot also appears, as usual, in the Rich Site Feed or Grid Feed display. You can select the desired WAV file for the alert in the Alert Call Sign Sound area on the Alert Sounds and Messages tab of DX Spot Checker Options.
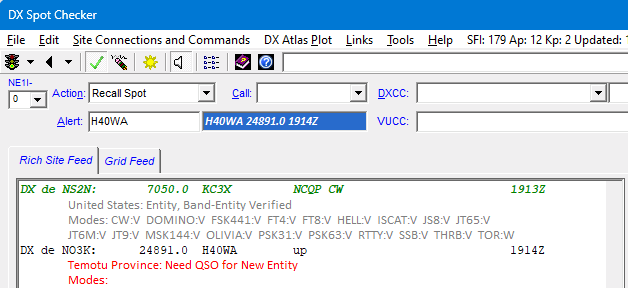
If desired, you can double-click the Alert box to play the selected sound as a test, and you can type TEST in the Alert box to test the alert function on each spot as it appears.
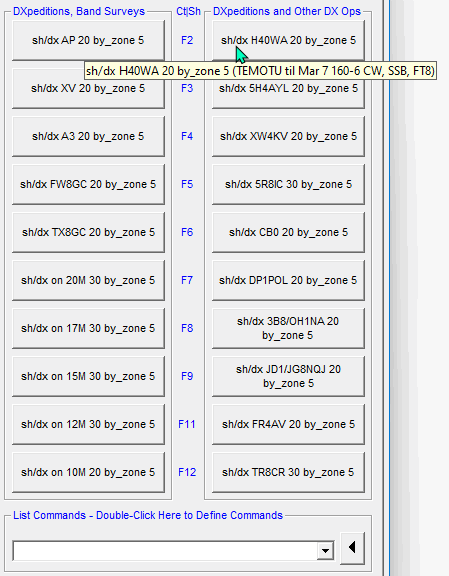
2. Additional Command Buttons Now Have Detail Text
As you know, the Additional Command buttons on the Rich Site Feed let you query the DX Cluster by simply clicking a button, using the DX Cluster queries you define on the DX Spot Checker Options window.
With this release, you can now add explanatory Detail text to each query on the DX Spot Checker Options window.
For example, say you're writing Detail text for a DXpedition-style sh/dx callsign query you defined in DX Spot Checker Options. You want the Detail text to include information about the DXpedition, such as its entity, effective dates, and bands and modes to be used.
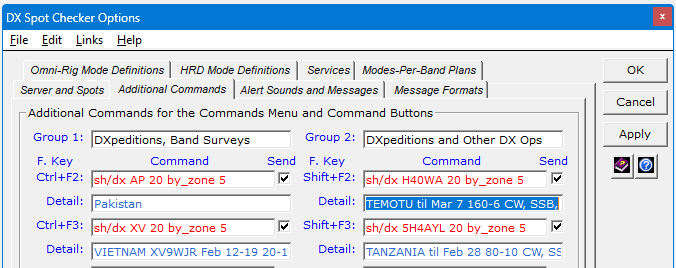
So when you're using the DX Spot Checker, you can hover your mouse cursor over each Additional Command button to read the Detail text you wrote about the query — to refresh your memory.
With the Send option selected for the query in DX Spot Checker Options, when you click the button, the DX Spot Checker sends the query to the server immediately, and the microhelp panel displays the query and its associated Detail text, enclosed in parentheses, as another reminder.

(If the information doesn't fit the microhelp panel, you can hover your mouse cursor over the panel and read the Detail text in a pop-up.)
3. Additional Command Group Headings Expanded
The number of characters permitted in Additional Command group headings in the DX Spot Checker has been increased to 28.
4. Access To Your DXCC Information Improved in the DX Spot Checker
When using the DX Spot Checker, you may want to access your DXCC information to see the bands and modes you need for a given entity, perhaps before or after clicking an Additional Command button or List Command entry.
In previous releases, the DXCC list box contained just the names of entities spotted. And it can still do that, if you desire, by clicking the Spotted Only option button.
But in this release, you can click the All Entities option button to have the DXCC list box contain all entities from the Entities module plus their standard prefixes in the neighboring list box.
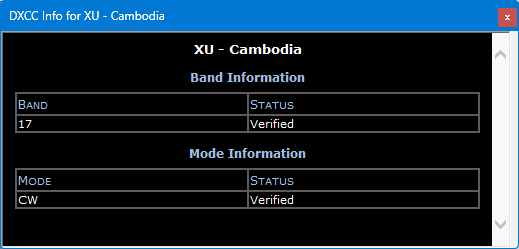
To access DXCC information, type the first few characters of a desired DXCC entity name or standard prefix and press Enter on your keyboard, or click Exec.
The DXCC information appears:

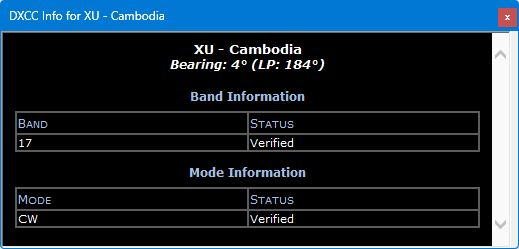
And bearing data appears, based on the coordinates in the Entities module.
5. Access To Your DXCC Information Also Added to the Additional Commands Tab in DX Spot Checker Options
You can now research your DXCC information on the Additional Commands tab in DX Spot Checker Options to see the bands and modes you currently have for a given entity — and by their absence the ones you need.
You might find doing so convenient when defining sh/dx queries for your Additional Command buttons.
Here's how:
- In the DXCC list box at the bottom of the tab, type the first view characters of the desired DXCC entity.
- Click Show DXCC Information, or press Enter on your keyboard.
- To dismiss the DX Info window, click Hide Information, or press Esc on your keyboard.

The DXCC information appears:
FTP Uploading of Active and Standard Reports Changed
1. Intrinsic FTP Uploading of Active and Standard Reports Now Deprecated
We have removed outdated code that previously provided support for uploading Active and Standard Reports to user-provided Web server space.
The code that manages the creation of Active and Standard Reports for local viewing remains fully functional and supported. Standard reports require the use of Web browsers that can display files locally.
2. Optional FTP Uploading of Active and Standard Reports Now Requires the Purchase of a Third-Party FTP Application
The code that manages the creation of Active and Standard Reports for Web viewing remains fully functional, only the intrinsic uploading of reports has been discontinued.
If you want to continue uploading Active and Standard Reports to your Web server, purchase FileZilla Pro® CLI from the FileZilla® Pro Web site at https://filezillapro.com and make the necessary changes to FTP processing in Preferences.
- On the Tools menu, click Preferences.
- Click the Report Viewer tab.
- In the FTP Uniform Resource Identifier box, type the URI FileZilla Pro CLI will use to connect to your Web server (FTP protocol) and upload your Active and Standard reports to the Web automatically.
The supported URI syntax is:
username[:password]@]host[:port][/path]
An example is:
dxer:DXingIsFun73#@www.domain.com
Where
username is the required server username
<password> is the optional server password (if a password is required by the server, but not included in the URI, FileZilla Pro CLI will prompt you for it)
host is the required host domain name or IP address (check with your Web host for the specific host address to enter)
[port] is the optional connection port
[path] is the optional initial remote path (absolute)
Introducing AI - Generic
AI – Generic prompts are intended for use with your favorite AI client, such as Microsoft® Windows® Copilot™, for acquiring information about any topic other than instructions for using DXtreme Station Log 15 SE. They are an ideal way to find topics for discussion during a QSO, or for acquiring generic Amateur Radio information. Keep in mind that AI – Generic prompts are not designed for use with the DXtreme-SL15SE-GPT, which is a custom Generative Pretrained Transformer that runs in ChatGPT® to provide information about, and instructions for using, DXtreme Station Log 15 SE.
As you know, you can type or speak your prompts directly into the AI application. But using the AI - Generic tab lets you:
- Save the prompts you'll use often — especially prompts containing live information from DXtreme Station Log 15 SE's log variables.
- Submit those prompts to the AI application by means of the Clipboard.
To use AI - Generic
- Display your preferred AI application (such as Microsoft Windows Copilot).
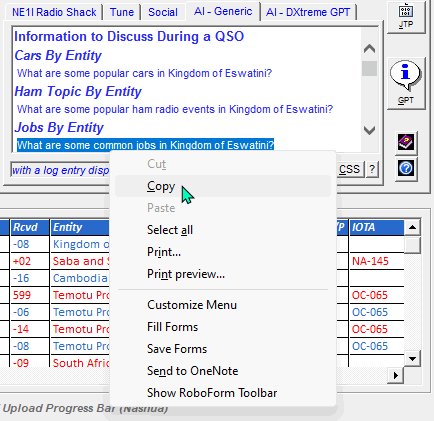
- Click the AI – Generic tab. Station Log displays one or more AI – Generic prompts within the script currently selected. If the script includes log variables connected to the Station Log window, or other qualifying source in the software, live data appears in the prompts when appropriate, such as when a log entry is displayed on the Station Log window (as it is in the image below).
- Using your mouse, select the AI – Generic prompt you want to submit to the AI. Right-mouse click and on the context menu, click Copy.
- Right-mouse click the Ask me anything box on the AI application. On the context menu, click Paste. Then click the AI application's send button or icon.
- And if you deem your subsequent prompts to be of value, consider adding them to appropriate prompts within your AI - Generic scripts.
- While displaying prompts, if you make relevant changes to a log entry on the Station Log window, double-click the caption of the AI – Generic tab to update prompts containing log variables connected to the Station Log window.
- If you want to change the current AI – Generic prompt script, click the browse button and select the desired script on the Open AI - Generic Prompt Scripts window. Station Log displays the new AI – Generic prompts immediately.
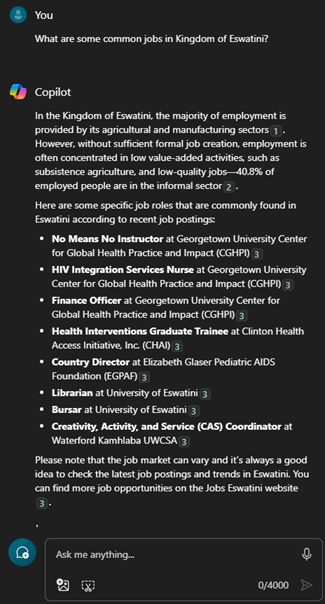
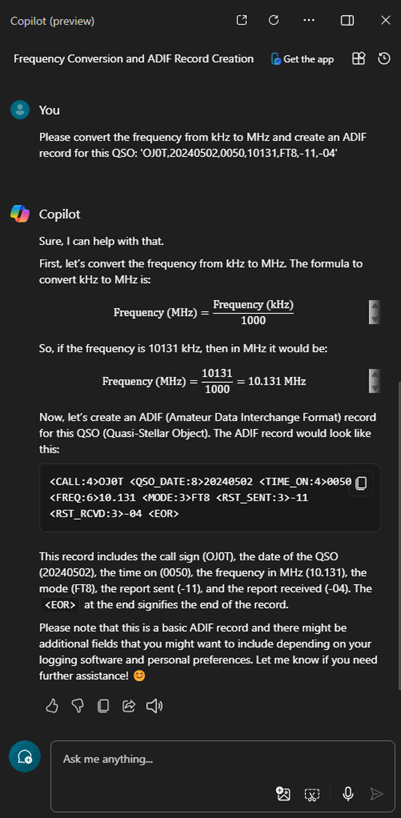
Here's a typical result, shown in Microsoft® Windows® Copilot™.
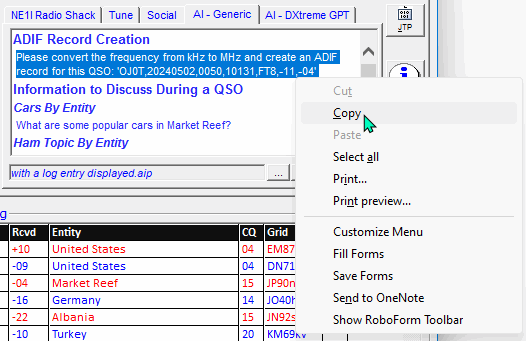
Here's another example, further showing the power of log variables when a log entry is displayed on the Station Log window:
Using your mouse, select the ADIF Record Creation prompt. Right-mouse click, and on the context menu, click Copy.
Right-mouse click the Ask me anything box on the AI application. On the context menu, click Paste. Then click the AI application's send button or icon.
Here's what Copilot™ did:
Hmmm ... a QSO is a Quasi-Stellar Object, eh?
Because your first prompt to any AI application represents the start of a conversation, let's have a little fun with Copilot's definition of QSO:
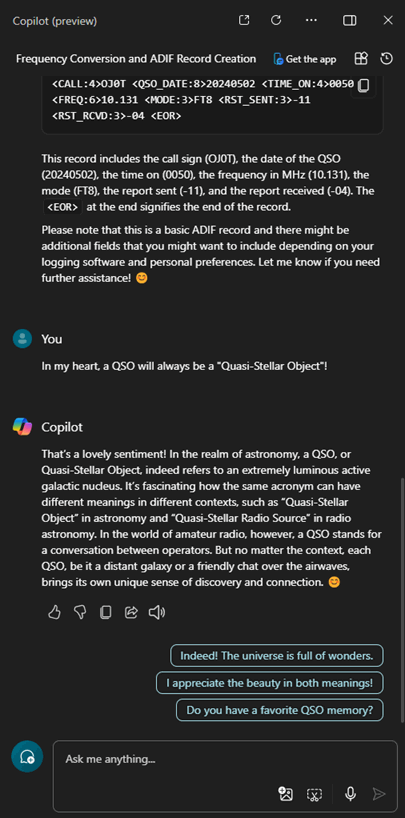
So, if a response does not satisfy you — or if it amuses you — type or speak subsequent prompts directly into the AI application until the conversation is satisfactory. In other words, don't hesitate to invite more details, clarification, or a sense of friendship.
Notes
- Using the Script Editor window, you can create and edit AI – Generic scripts. Default scripts come with DXtreme Station Log 15 SE. You can create as many scripts as you want.
- The AI application or web site must be capable of accepting Clipboard Paste operations by means of a context menu or the Shift+Insert keyboard shortcut.
- AI – Generic is designed for use on Microsoft Windows 10 and Windows 11 only.
Introducing AI - DXtreme GPT
AI - DXtreme GPT prompts are intended for use with DXtreme-SL15SE-GPT (our Generative Pretrained Transformer, running in a dedicated ChatGPT® web page) for acquiring information about, and instructions for using, DXtreme Station Log 15 SE. Keep in mind that AI - DXtreme GPT prompts are not designed for use with your favorite AI application, nor should they be used to acquire general information. Use AI – Generic prompts for that purpose.
Like AI - Generic prompts, which are designed for use with your favorite AI application, AI - DXtreme GPT prompts can include live data from log variables that are populated as you use DXtreme Station Log 15 SE. While displaying prompts, if you make relevant changes to a log entry on the Station Log window, double-click the caption of the AI – DXtreme GPT tab to update prompts containing log variables.
While you can type or speak your prompts directly into DXtreme-SL15SE-GPT, we suggest using the AI - DXtreme GPT tab because it lets you:
- Save the prompts you'll use often — especially those prompts containing live information from DXtreme Station Log 15 SE's log variables.
-
Submit those prompts to DXtreme-SL15SE-GPT
by means of the Clipboard, along with the optional attachment of
Additional Static GPT Prompt/Instruction Text to all prompts copied
using the Copy+ button.
There are distinct advantages to including additional static prompts and instructions, such as greater accuracy and multiple output formats. You can define the Additional Static GPT Prompt/Instruction Text you want on the Internet tab of Preferences, including whether the text will be attached before or after the Copy+ prompt.
To use AI - DXtreme GPT
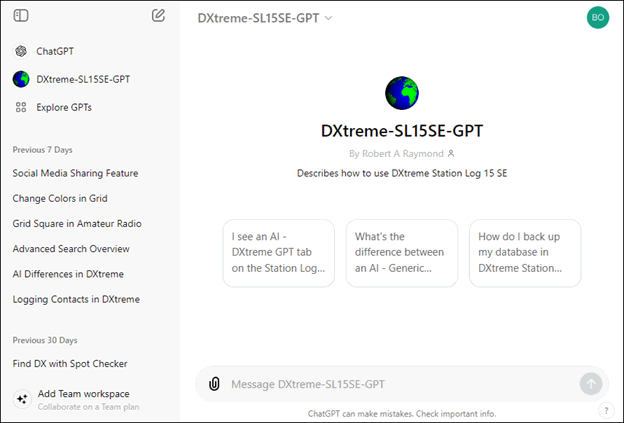
- Click the GPT button in the Sidebar to access DXtreme-SL15SE-GPT1:
- Click the AI – DXtreme GPT tab. Station Log displays one or more AI – DXtreme GPT prompts within the script currently selected. If the script includes log variables connected to the Station Log window or other qualifying source in the software, live data appears in the prompts when appropriate, such as when a log entry is displayed on the Station Log window.
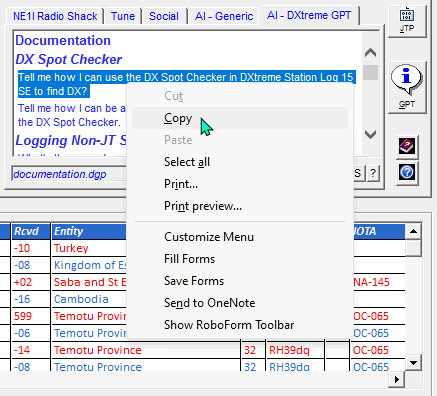
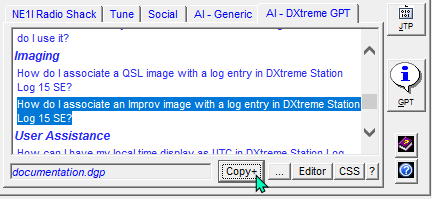
- Using your mouse, select the prompt you want to submit to DXtreme-SL15SE-GPT.
- Right-mouse click. On the context menu, click Copy.
- On DXtreme-SL15SE-GPT, right-mouse click the Message DXtreme-SL15SE-GPT box. On the context menu, click Paste.
- Click the send icon.
- Remember, your first prompt to any AI application represents the start of a conversation. If the first response does not satisfy you, type or speak subsequent prompts directly into DXtreme-SL15SE-GPT until the conversation is satisfactory. In other words, don't hesitate to ask for more details or clarification.
- If you deem your subsequent prompts to be of value, consider adding them to appropriate prompts within your scripts.
- Using your mouse, select the prompt you want to submit to DXtreme-SL15SE-GPT.
- Click the Copy+ button.
- On DXtreme-SL15SE-GPT, right-mouse click the Message DXtreme-SL15SE-GPT box. On the context menu, click Paste.
- Click DXtreme-SL15SE-GPT's send icon.
- Remember, your first prompt to any AI application represents the start of a conversation. If the first response does not satisfy you, type or speak subsequent prompts directly into DXtreme-SL15SE-GPT until the conversation is satisfactory. In other words, don't hesitate to ask for more details or clarification.
- If you deem your subsequent prompts to be of value, consider adding them to appropriate prompts within your scripts.

1 — To access and use DXtreme-SL15SE-GPT and other custom GPTs in ChatGPT, you must have a paid subscription to ChatGPT Plus or greater. Refer to the OpenAI® ChatGPT Product page at https://www.openai.com for more information. There are many benefits to having a subscription, beyond access to DXtreme-SL15SE-GPT.
You can submit a prompt exactly as it appears, or you can submit a prompt with the Additional Static GPT Prompt/Instruction Text from Preferences.
To Submit a Prompt Exactly As It Appears

Here's the result:

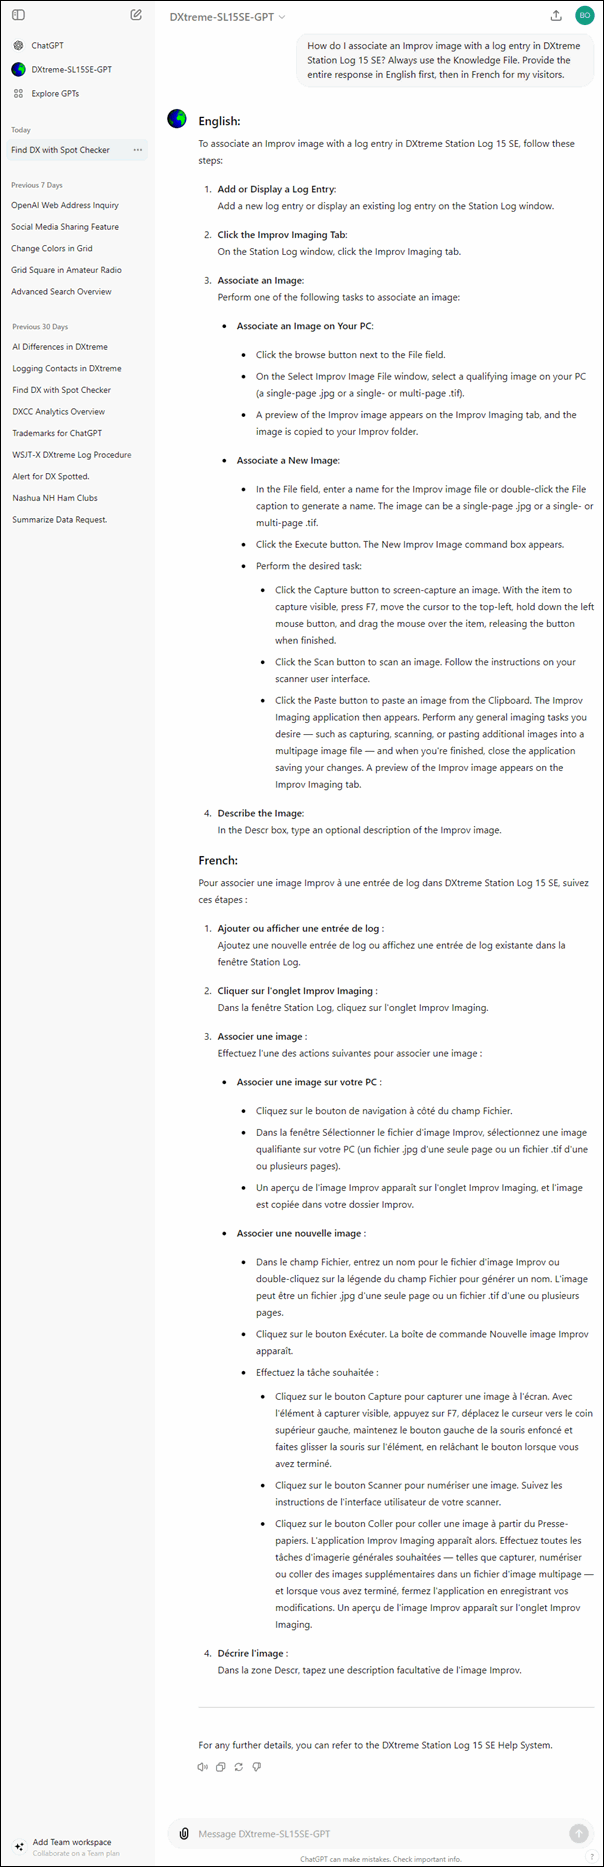
To Submit a Prompt Along with the Additional Static GPT Prompt/Instruction Text From Preferences

As you can see above, the prompt you selected appears in the box along with the Additional Static GPT Prompt/Instruction Text from Preferences.
Here's the result:
URL and Additional Static GPT Prompt/Instruction Text
In the Miscellaneous Internet Sites area of the Internet tab in Preferences, there are three controls you'll find useful.
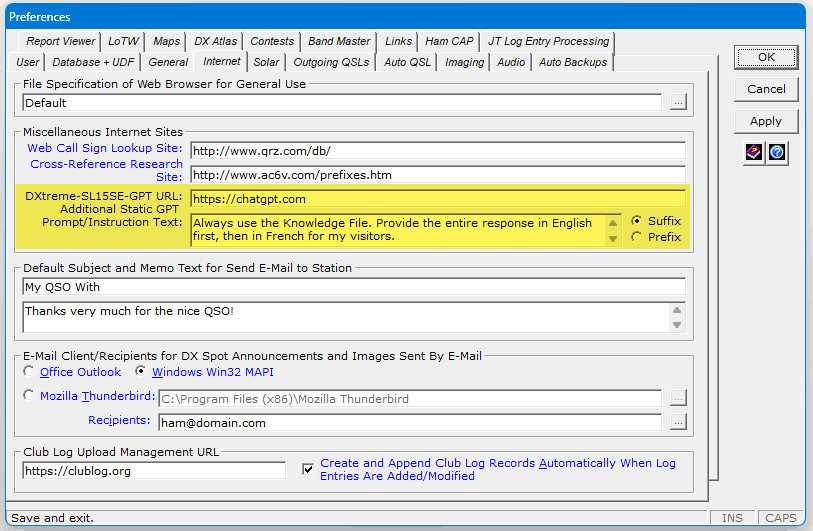
- DXtreme-SL15SE-GPT URL — Is the URL of DXtreme-SL15SE-GPT, which will be provided by DXtreme Software at shipment. The only time you would change the URL is when DXtreme Software issues a new one via the DXtreme Station Log 15 Information Center.
- Additional Static GPT Prompt/Instruction Text — Is where you can type the additional prompt and/or instruction text you want to attach to every prompt copied via the Copy+ button on the AI - DXtreme GPT tab.
- Suffix/Prefix — These buttons let you choose the placement of the Additional Static GPT Prompt/Instruction Text: before or after the prompt copied via the Copy+ button.
Note: We have found that including the Always use the Knowledge File instruction increases, at times, the accuracy of responses from DXtreme-SL15SE-GPT. Feel free to remove or change this instruction and to add your own, such as we did when requesting a bilingual response.
Notes
- Using the Script Editor window, you can create and edit AI – DXtreme GPT scripts. One script comes with DXtreme Station Log 15 SE. You can edit it and/or create as many scripts as you want.
- If you want to change the current AI – DXtreme GPT prompt script, click the browse button and select the desired script on the Open AI - DXtreme GPT Prompt Scripts window. Double-click the AI – DXtreme GPT tab and Station Log displays the new prompts immediately.
- AI – DXtreme GPT and DXtreme-SL15SE-GPT are designed for use on Microsoft Windows 10 and Windows 11 only.