Topics
- DX Spot Checker Enhanced
- JT Log Entry Processing Enhanced
- User Defined Fields Enhanced
- Solar Indices Acquisition Enhanced
- Third-Party Audio Integration Added
- Outgoing QSL Web Service Integration Added
- DXCC and WAS Analytics Needed Lists Added
- Variables-Based Delimited Records Facility Added
- Other Product Enhancements
To Order
DX Spot Checker Enhanced
1. Service Set Identifier Box
Have you ever logged on to the same cluster server on a second device and been forcibly logged off the first? If yes, the Service Set Identifier box — labeled with your call sign and a trailing hyphen — will make that a thing of the past.
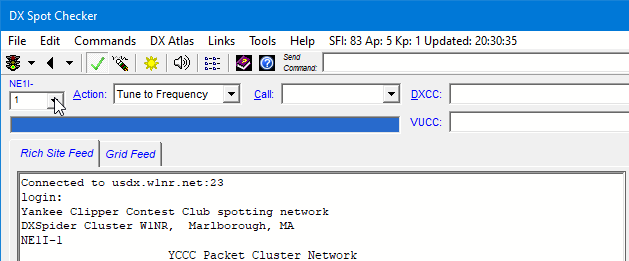
Just select a unique Service Set Identifier (SSID) on each device when logging on, and simultaneous connections to the server will be yours.
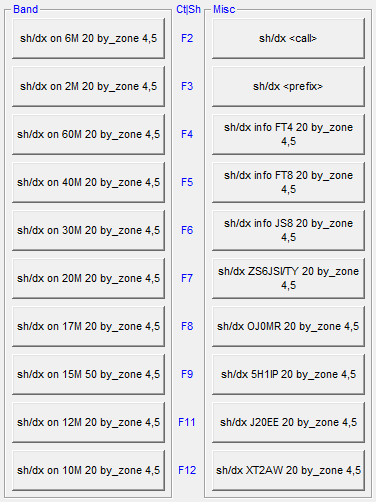
2. Wider DX Query Command Buttons in Rich Site Feed Mode
DX Query Command buttons are now wider, making it easier to define, read, and send pre-configured commands to the server. Commands are configured on the DX Spot Checker Options window.
3. List Commands Box and Module
The List Commands box contains a list of pre-configured commands you can send to the cluster server immediately. By default, DXtreme Station Log 15 ships with list commands that query the cluster server for recent FT8 Fox/Hound activity.
Simply click the desired list item:

Then the arrow button:

And the results appear on the Rich Site Feed display.
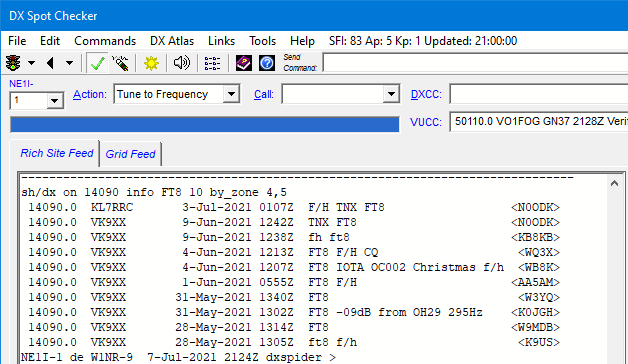
You can define, edit, and delete any list commands you want using the
Define List Commands Module window, which is accessible by
double-clicking List Commands — Double-Click Here to Define
Commands:

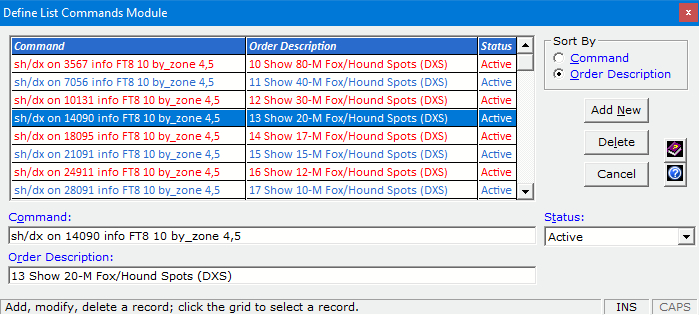
The numbers 10, 11, 12, and so on in the Order Description column sort the list in the desired order.
JT Log Entry Processing Enhanced
1. New JT Processing Button
![]()
The new JTP button provides access to the JT Processing menu. Unlike the earlier version of the button, which is still present on the Station Log window, the JTP button is more discoverable and accessible. In addition to clicking the button, you can Tab to it and press Enter to access its menu. You can also type Alt-J to access its menu.
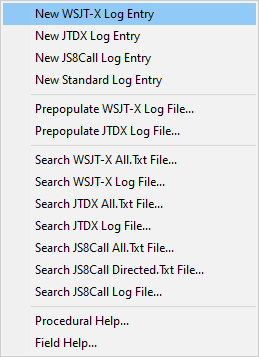
When the menu is open, you can click the function you want. Or you can press the up/down arrow keys to apply focus to the desired function and press Enter.
2. JT Processing is Now Based on the wsjtx_log.adi File
WSJT-X and JTDX have the benefit of displaying worked-before status indications natively, letting you keep your eyes glued to the WSJT-X or JTDX interface while operating — which we consider important, especially when using quick modes like FT8, FT4, and others.
DXtreme Station Log 15 now imports contact information from the official wsjtx_log.adi file instead of the all.txt file because the former file is based on the ADIF standard and the latter file is proprietary and subject to possible changes. The most important reason for this change, however, is that you'll have a bit more time after the QSO ends to log the contact in Station Log.
As in the previous release, new users begin by prepopulating the wsjtx_log.adi file with qualifying contact data from the Station Log database. Read the DXtreme Station Log Data Sheet on this web site to see how easy prepopulation is accomplished. After prepopulation, you operate.
After working a station using WSJT-X, a quick click of the OK button on the WSJT-X Log window writes a bare-bones log record to the wsjtx_log.adi file.
After working a station using JTDX, the bare-bones log record is written to the wsjtx_log.adi file automatically and immediately (if JTDX is so configured).
Worked-before status indications appear on WSJT-X or JTDX instantly. No other software is required.
Logging the Contact In Station Log 15
Now that the log record is in the wsjtx_log.adi file, click the JTP button ...
![]()
and then click New WSJT-X Log Entry or New JTDX Log Entry depending on the application you're using. Information from the bare-bones log record appears on the Station Log window.
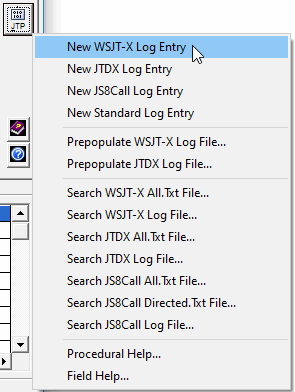
Finish the log entry by clicking OK on the Station Log window, before or after specifying any additional information.
That's it. Contact information is in the Station Log database as well as the wsjtx_log.adi file.
3. JS8Call Added to the JT Processing Menu
Logging from the JS8Call application has been added to the JTP menu. JS8Call communicates using an extension of FT8 called JS8 (Jordan Sherer designed 8-FSK modulation), which is an official ADIF mode.
Because JS8Call specializes in real-time conversational keyboard-to-keyboard QSOs, store-and-forward messaging, and automatic and manual station queries and replies, the concept of worked-before status (whereby operators are discouraged from making more than one contact per band and mode) does not apply. Therefore, prepopulation of its log file is neither required nor provided.
Logging Contacts
After making a contact that qualifies as a two-way QSO, invoke the JS8Call Log QSO window. Type the signal reports sent and received along with any other data you want, such as comments and transmit power used. Then click Add to Log and JS8Call writes the log record to the js8call_log.adi file.
In Station Log 15, click the JTP button ...
![]()
and then click New JS8Call Log Entry. Information from the completed contact appears on the Station Log window..
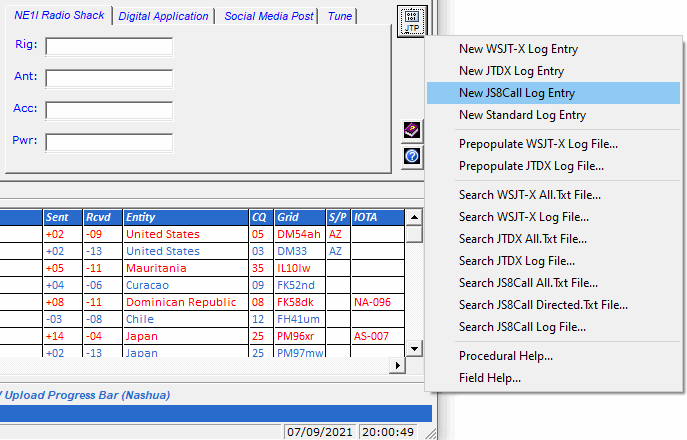
Finish the log entry by clicking OK on the Station Log window, before or after specifying any additional information.
That's it. Contact information is in the Station Log database as well as the js8call_log.adi file.
Notes Regarding WSJT-X, JTDX, and JS8Call
- Only the most recent WSJT-X, JTDX, and
JS8Call contacts can be logged using the above methods. If desired, you can
start a log entry, begin a contact with another
station, and finish logging the previous contact before
the new QSO ends. For rapid-fire and contest operations, you might want to
log in WSJT-X, JTDX, or JS8Call and use Station Log's Import ADIF
Utility to import log entries after you've finished. The
Station Log 15 Help System explains how.
- If you want to view or search an application's
All.Txt or Log file, you can click the
appropriate entry on the JT Processing menu. You might
find these functions useful to search for decoded stations, entities, or grid
squares without having to interrupt, or be interrupted by, new decodes on the
application's window. JS8Call also has a Directed.Txt file you can
view or search.
User Defined Fields Enhanced
1. Double the Number of User Defined Fields
The User Defined Fields tab now has 14 fields across two
sections, letting you enter and track more of the information that's important
to you.
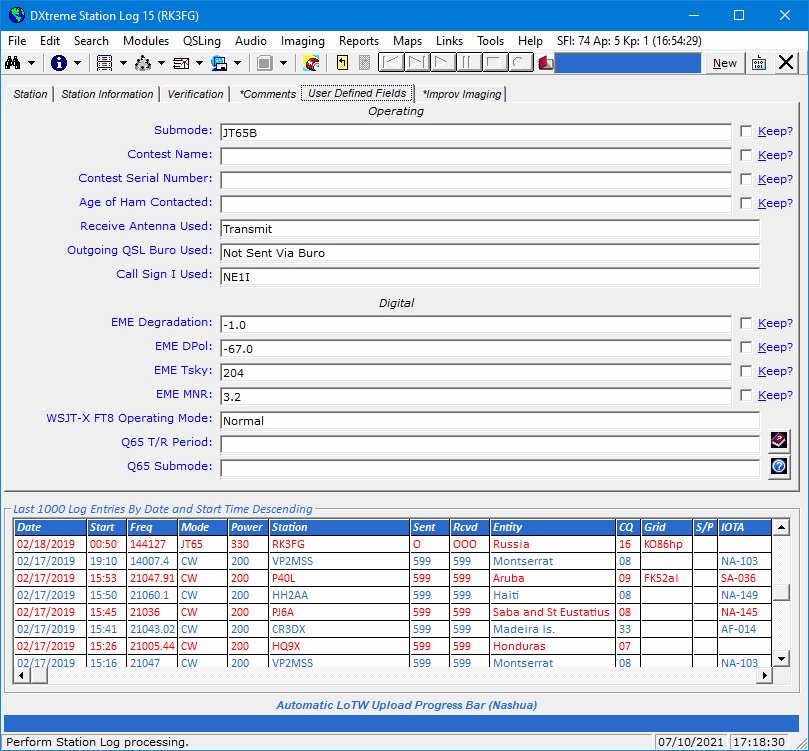
There continues to be two types of user defined fields (UDFs): Text Box Fields and List Box Fields.
- Text Box Fields — Station Log's eight text box fields let you type the information you desire. (The information you enter can be retained over several log entries by selecting the adjacent Retain check box.)
- List Box Fields — Station Log's six list box fields let you select the information you desire from a list of items you also define.
As in earlier releases, you can run Performance, Bands, or Stations reports specifically for, or filtered by, the data entered in these fields. You can also enter default UDF values you want the ADIF Import Utility to write into every imported contact record.
2. User Defined Field Section Definitions and Field Order
You define the UDFs on Station Log's Preferences window.
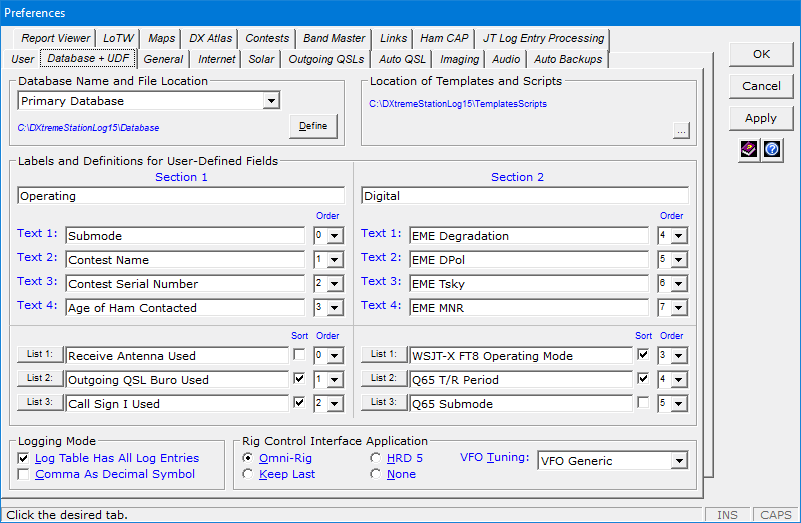
Defining UDFs involves:
- Labeling the two sections.
- Labeling each field.
- Entering the list items you want to appear in each list box field.
- Setting the field order by field type across sections on the User Defined Fields tab of the Station Log window.
Solar Indices Acquisition Enhanced
1. Defending Against Outages
As some users are aware, NOAA is unavailable sometimes. In previous releases, NOAA's absence and Station Log's continued polling for it caused slowdowns when Station Log was started. The only recourse was to turn off the Automatic Acquisition of Today's Solar Indices facility and wait for the connection to NOAA 's FTP server to become available again.
To help remedy this situation, we have changed the server connection for the Automatic Acquisition of Today's Solar Indices facility (which populates the Solar Indices Display on the Station Log menu bar and the SFI, Ap, and Kp fields for log entries) from FTP to the more stable HTTPS. We now use FTP solely for the Historic Solar Indices facility. The remaining subsections provide more information.
2. Solar Indices on the Station Log Window
On the Menu Bar
The Station Log window continues to display today's current SFI (Solar Flux Index), Ap (A-Index), and Kp (K-Index) values on the menu bar automatically every 30 minutes. Your Internet connection must be active, the acquisition of solar indices must be enabled on the Solar tab in Preferences, the solar information must be available from NOAA, and the Station Log window must be in Select mode (no log entry displayed).

As before, you can click the display to update manually.
In the new Solar Indices Area
When you click the New button or the JTP button to log a contact, the now editable Solar Indices text boxes — entitled SFI, Ap, and Kp — display the solar information that is valid currently — provided your Internet connection is active, the acquisition of solar indices is enabled in Preferences, and solar information is available from NOAA.

The current solar indices are also displayed when you double-click the SFI, Ap, and Kp text boxes and when you tab out of the Call Sign, Date, Start, and Freq boxes. If server access to NOAA is slow, you might need to perform one of those tasks to display the indices. When you click OK, the software saves the displayed solar indices with the log entry.
If all else fails, you can type the solar indices manually for saving to the log entry. If you need to find solar information that is older than right now, you can click the Historic button to access a web page of relevant information (one is specified in Preferences by default).
When an existing log entry is on display, you can also modify the solar indices manually.
If you need to type solar indices often, in Preferences you can turn on Tab access to the SFI, Ap, and Kp text boxes as well as the Historic button.
As before, you can run Performance, Stations, and Bands reports against the solar data.
3. Solar Indices in Preferences
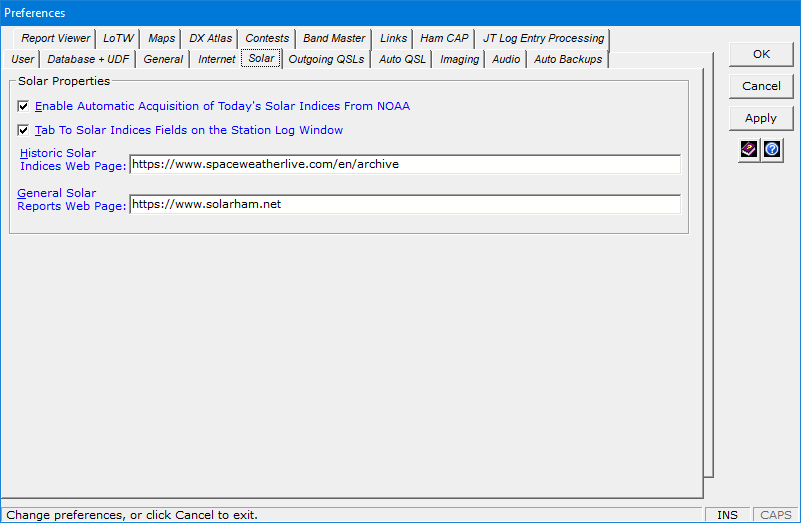
Solar properties are simplified in Preferences. New fields control Tab access to the controls in the Solar Indices area of the Station Log window and contain the URL of an Historic solar indices web page for your research.
4. Historic Solar Indices Update
The Historic Solar Indices Update facility continues to depend on NOAA's FTP Server. As such, the fields that control access to the FTP server have been moved from Preferences to this window.
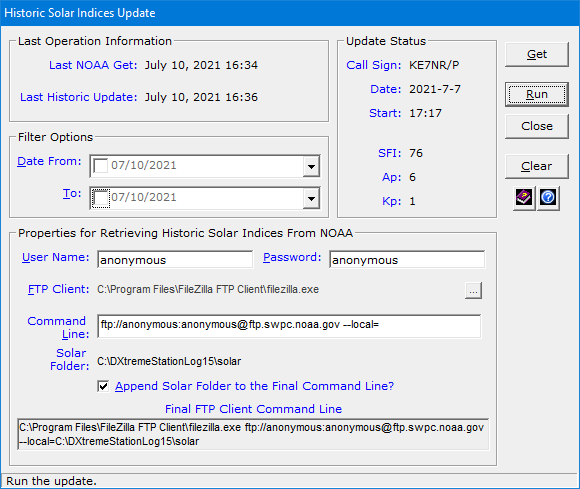
The facility lets you update log entries with solar data valid at the time of the QSO, provided the QSO took place on or after January 1, 1997 and the information is available from NOAA.
Running this update remains useful after performing an ADIF Import. It is also useful when solar values were not available from NOAA at the time you logged your QSOs.
The solar data appears in the Solar Indices area of the Station Log window.
5. Solar Indices in the ADIF Import Utility
The ADIF Import Utility has solar indices fields that mimic those on the Station Log window.
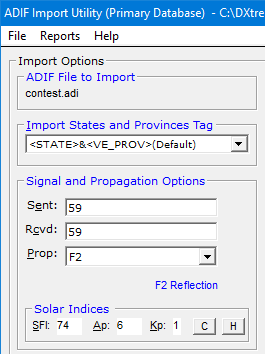
When the Station Log window is displaying solar indices in its menu bar, you can click the C button in the Solar Indices area to display those indices in the SFI, Ap, and Kp boxes for writing into each imported contact record. If the values are not available due to a NOAA outage, or if Automatic Acquisition of Today's Solar Indices From NOAA is not enabled in Preferences, you can type the appropriate values manually.
If you are importing contacts several hours after their QSOs occurred, you can click the H button to access a web page of historic solar indices information (one is specified in Preferences by default) to perform research and type the appropriate SFI, Ap, and Kp values for writing into each imported contact record. Alternatively, you can run an Historic Solar Indices Update after the import finishes.
Third-Party Audio Integration Added
Station Log 15 supports the use of a third-party audio application, supplied by you, to provide recording, playing, and editing of audio clips in a variety of audio formats. A third-party application, like Audacity®, is the most convenient way of recording audio from a USB-connected radio.
Note: For ease of playback, the executable file of the application you select must be capable of accepting, as a command-line argument, the name of an audio file.
To Record an Audio File and Link It to a Log Entry
After the application is specified in Preferences, click the Access Third-Party Audio Application button in the Signal Quality, Propagation, and Audio area of the Station Log window to invoke the application.
![]()
When the third-party application appears, refer to its documentation to record and process audio from the desired source.
When you have finished recording, in the third-party application, save the audio file in the desired format into the Audio subfolder of Station Log 15, or any other location you want.
In Station Log 15, add or display the log entry to which the audio file will be linked. In the Signal Quality, Propagation, and Audio area, click the Browse for an Audio File button.
![]()
On the Select Audio File window, navigate to and select the third-party audio file you want to link.
If the file resides outside the Audio folder specified in Preferences, Station Log 15 copies the file into that folder. The assigned file is then backed up when you close Station Log provided automatic audio backups are configured in Preferences.
Click OK to save the log entry with the linked audio file.
To Play and/or Modify the Audio File
If necessary, display the desired log entry. In the Signal Quality, Propagation, and Audio area, click the Access Third-Party Audio Application button.
![]()
When the third-party application appears, refer to its documentation to play and/or modify the audio file.
Outgoing QSL Web Service Integration Added
Overview
DXtreme Station Log 15 has a new Outgoing QSL Web Service facility that makes it easy to send official QSL cards via a third-party QSL bureau web site, such as QDure at:
At the time of this writing, DXtreme Software recommends QDure.
Note: As part of setting up an Outgoing QSL Web Service in Preferences, you type the name of the service you want to use and that name appears in menus throughout Station Log 15 (hence the name QDure in our screen shots).
How It Works
You begin by adding, modifying, or displaying a log entry. Then, on the Verification/Outgoing tab, make sure the Outgoing QSL Sent box is set to Yes either manually or automatically as determined in Preferences. If necessary, click OK.
Note: Because you will likely pay for the QSLs you send via an Outgoing QSL Web Service, and to avoid sending QSLs by mistake, Station Log 15 requires setting the Sent box to Yes before appending QSL records to the Service workfile.
Next, on the Station Log toolbar, click the Process Outgoing QSL
Web Service button.
![]()
Or click the arrow next to the button and then Create/Upload {Name of Outgoing QSL Web Service} Records.

Station Log 15 creates the Outgoing QSL Web Service record and prompts you for the next action to perform.
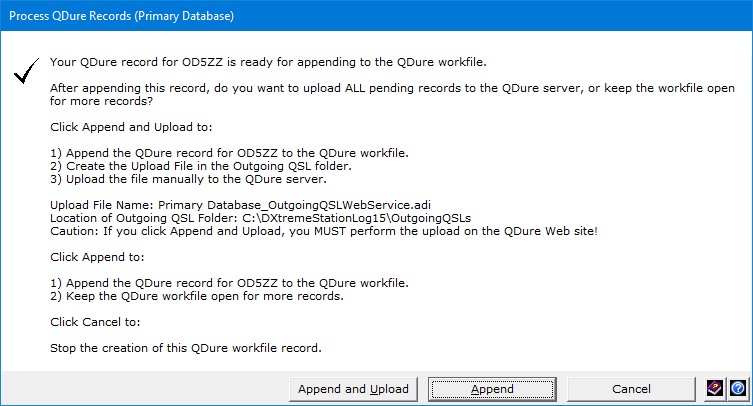
Click the appropriate button.
When there's no log entry on display, if desired, you can click the
Process Outgoing QSL Web Service button to upload pending
workfile records to the server.
![]()
Or click the arrow next to the button and then Create/Upload {Name of Outgoing QSL Web Service} Records....

Station Log 15 prompts you for the next action to perform.
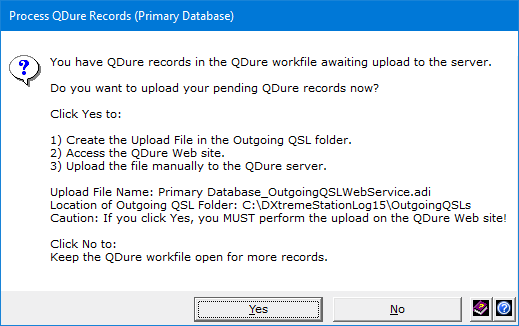
Click the appropriate button.
Whenever you upload records, Station Log 15 displays the Outgoing QSL Web Service site in your web browser where you must submit the upload file manually. (The Outgoing QSL Web Service site provides upload instructions.)
Viewing the Workfile
You can click the arrow next to the Process Outgoing QSL Web Service button and then View/Edit the {Name of Outgoing QSL Web Service} Workfile whenever you want to see or edit the records in the workfile.

Preferences
On the Outgoing QSLs tab of Preferences, the Outgoing QSL Web Service Properties area lets you specify the options you want.

The Notes text box lets you type text that will appear on all bureau QSLs by means of the NOTES ADIF tag.
The QSL Msg text box lets you type text that will appear on all bureau QSLs by means of the QSLMSG ADIF tag.
Outgoing QSL Web Service functions are also accessible via the QSLing -> Create menu on the Station Log window.
Outgoing QSL Web Service records are managed per database.
Import ADIF Utility
When Automatic Bureau QSL Generation is enabled for the ADIF Import Utility in Preferences, you can select the Outgoing QSL Web Service Records check box on the ADIF Import Utility window to automatically generate ADIF QSL Record files you can upload to your Outgoing QSL Web Service.
Automatic Bureau QSL Generation automatically generates ADIF QSL Records for stations outside your home entity worked the first time ...
- Overall
- Per band
- Per mode
DXCC and WAS Analytics Needed Lists Added
DXCC Needed List
After double-clicking a Worked or Verified data element for a desired band or for all bands in the Band Entities Summary area, and after the Entity List area displays its list of entities, you now can click the Entity Needed List hyperlink to generate a list of entities you still need for the mode, data element, and band(s) clicked.
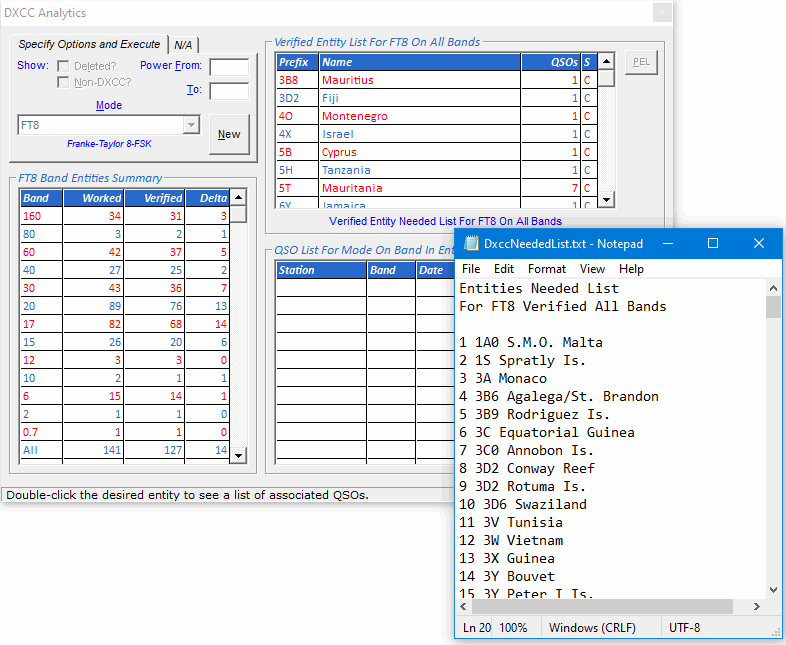
WAS Needed List
After double-clicking a Worked or Verified data element for a desired band or for all bands in the Band WAS Summary area, and after the WAS List area displays its list of states, you can now click the WAS Needed List hyperlink, as shown below, to generate a list of states you still need for the mode, data element, and band(s) clicked.
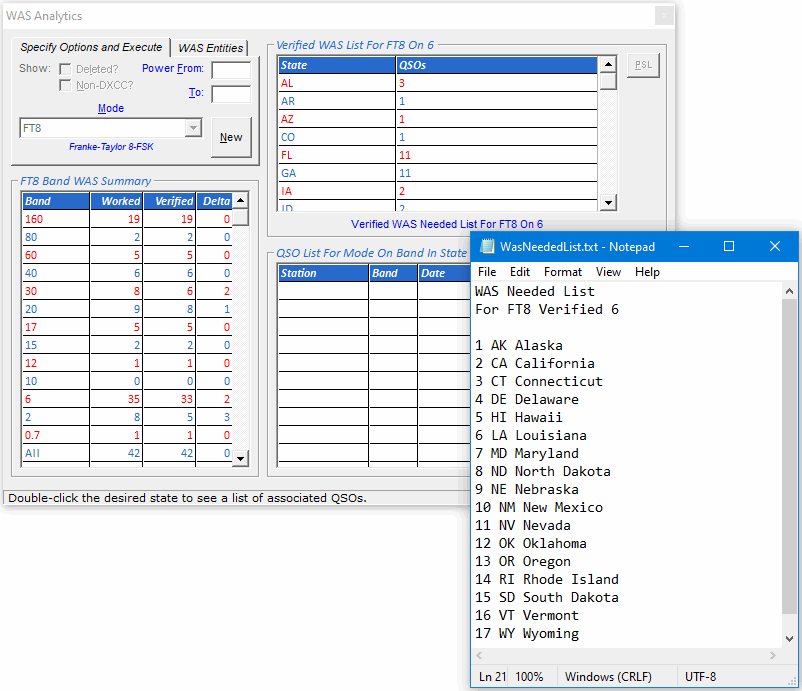
Retain
If you want to retain your DXCC or WAS needed lists, on the File menu of Notepad, click Save As and save each list to the desired location using a unique file name. Alternatively, you can print each list.
Variables-Based Delimited Records Facility Added
Overview
The Variables-Based Delimited Records (VBDRs) facility allows you to create and output station reports and exports of your own design to suit your own purposes. For example, you can use the VBDR facility to:
- Output unique station reports in addition to the standard reports DXtreme Station Log 15 provides.
- Generate delimited files for import by applications that do not import ADIF files. These applications can include database managers, QSL generators, spreadsheets, word processors, etc.
Automatic and Manual Writing
You can have Station Log write Variables-Based Delimited Records (VBDRs) automatically each time you add a log entry. You can also write VBDRs manually any time a log entry is displayed on the Station Log window.
In addition, when performing an ADIF import, you can set the ADIF Import Utility so it writes VBDRs automatically as stations are imported.
Scripts Allow You to Design Your Own VBDR Output
The Script Editor is where you design and edit your VBDR scripts.
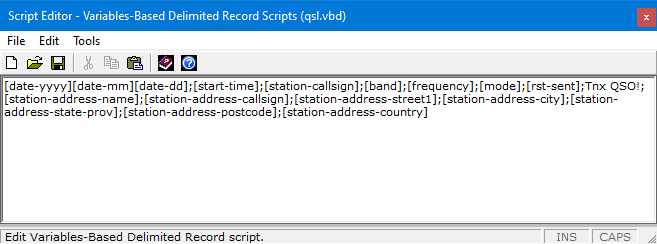
VBDR scripts include log variables — like [date-yyyy] — and can, at your discretion, include delimiter characters and boilerplate text.
Each log variable contains data from its corresponding field on the Station Log or Preferences window. For example, the [date-yyyy] log variable contains the year of the log entry currently on display on the Station Log window while [frequency] contains the frequency in kHz.
The easiest way to add log variables is to use the Log Variables Lookup, which describes each variable and lets you drag and drop — or copy and paste — log variables into your script.
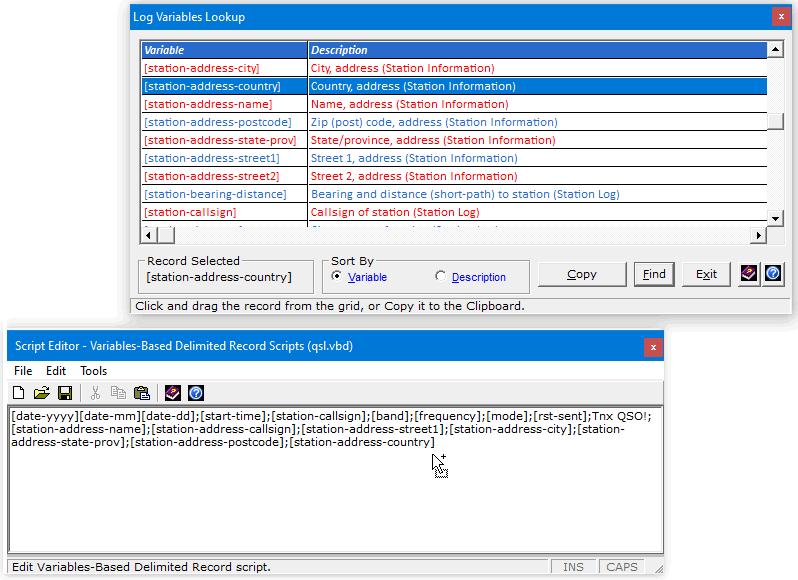
(A Log Variables Lexicon in the Help system also describes each variable.)
To add delimiter characters, you simply type the ones you plan to use when you import the VBDR output file into another application. Be sure to use only one kind of delimiter character per file (like the semicolon in the previous screen shots), typing each one between the desired log variables and, optionally, boilerplate text. To add boilerplate text, you can type just about whatever you want.
Delimiter characters and boilerplate text will appear amidst the data in each record of the output file.

Scripts must be saved with a .vbd extension in the Templates and Scripts folder specified in Preferences. There is no limit to the number of scripts you can create. The qsl.vbd script comes with Station Log 15.
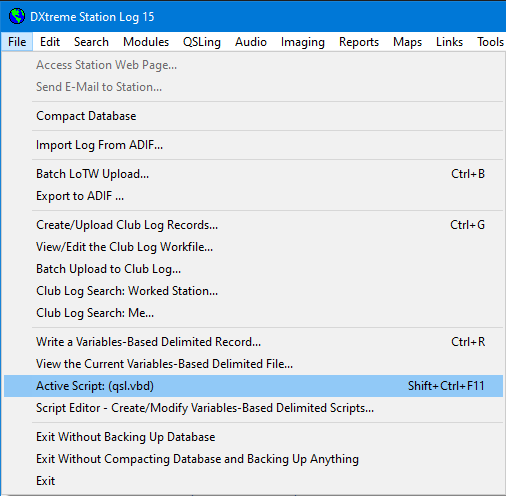
Prior to writing VBDRs, a script must be activated by selecting it on the File menu of the Station Log window. We refer to this script as the active script. The file name of the active script appears in parentheses next to Active Script on the File menu.
When using the VBDR facility in the ADIF Import Utility, a script can be activated by clicking the Select the VBDR Active Script button and selecting the desired script file.
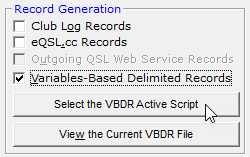
The file name of the active script appears on the button.
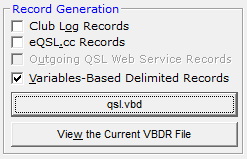
The name of the VBDR output file is the same as the name of the script file selected, except that its extension is txt. The output file resides in the Exports folder specified in Preferences.
For example, if you select a script file named qsl.vbd, the VBDR output file will be named qsl.txt.
There is no limit to the number of scripts and output files you can create; you can switch between them by changing the Active Script on the File menu of the Station Log window or on the ADIF Import Utility window.
VBDR Files: Viewing, Editing, Exporting/Importing
When you click View the Current Variables-Based Delimited Records File on the File menu of the Station Log window (or on the ADIF Import Utility window), Notepad appears with the current VBDR file loaded.

At your discretion, you can view and edit this file whenever you wish. If you want to import it into another program, you can leave it in the same location on your drive, or save it elsewhere.
If you want to clear the file of "old" records and start over, you can simply delete its records and save the blank file using the same file name in the Exports folder specified in Preferences.
Other Product Enhancements
1. VFO Tuning and VFO Selection
VFO Tuning has been moved from the DX Spot Checker Options window to Preferences.

VFO Selection has been moved from the DX Spot Checker Options window to the Tune tab (formerly Direct Tune) on the Station Log window.
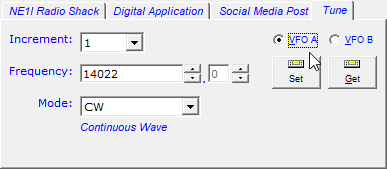
When Omni-Rig is enabled, you can click the VFO tuning option that works best with your radio. Some experimentation is necessary.
- When you select VFO A and B in Preferences, the VFO A and VFO B option buttons are enabled on the Tune tab of the Station Log window, and the Tune VFO-A to Frequency and Tune VFO-B to Frequency items appear on the Shortcut menu of the DX Spot Checker. On some radios, tuning occurs on the VFO corresponding to the option button or menu item clicked (A or B). Inexplicably, on other radios, tuning occurs only when clicking the VFO A option button in Tune and the Tune VFO-A to Frequency item on the Shortcut menu of the DX Spot Checker. In this instance, tuning occurs on the VFO currently selected on your radio. (We have no control over this behavior.)
- When you select VFO Generic, the VFO A option button is the only one enabled in Tune and just the Tune Rig to Frequency item appears in the Shortcut menu of the DX Spot Checker. Tuning occurs via the VFO currently selected on your radio (A or B).
2. Click for Street Map
A Click for Street Map hyperlink has been added to the Station Information tab of the Station Log window (and its Maps menu). Clicking it displays a street or satellite map of the station you worked based on the coordinates sent to the mapping web site specified in Preferences.

You can specify the caption of this hyperlink (and menu item) and the address of the web page providing the service on the Maps tab of Preferences. The web page url must accommodate the coordinates passed.
3. IOTA
You can now add, modify, and delete IOTA numbers manually in the IOTA Module.
4. Database Backup Prior to ADIF Import and LoTW QSL Update
When you perform an ADIF Import or LoTW QSL Update, a Browse For Folder dialog box now appears automatically, prompting you to select a writable folder (selecting Desktop is suitable) into which the software places a copy of your current database.
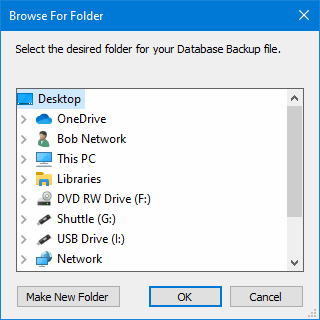
This action protects you in case the import or update fails, providing an opportunity to close Station Log, replace the affected database file (dxslme.mdb) with the backup file in the folder you selected, restart Station Log, and try the import again after correcting any problems in the source ADIF file.
5. Shortcut MHz Instead of Band on Direct Print Labels
If Always Create Multi-line QSL Labels is selected on the Outgoing QSLs tab of Preferences, you can now select the Shortcut MHz Instead of Band on Direct Print QSL Labels check box to write the Shortcut frequency in MHz instead of the band in meters on Direct Print labels. (The Shortcut frequency in MHz is defined on the Bands module window). When the check box is cleared, the software writes the band in meters on Direct Print labels.